February 27, 2019

Sweet and Savory Simmered Kabocha Squash


This is a recipe I first ate in Japan and squash is one of my favorite vegetables in nimono (simmered) dishes. In this one, squash is simmered in a sweet and savory dashi-soy sauce broth and it works really wonderfully with the squash's sweet flavor and soft, smooth texture.

I have tried to make this dish several times since coming home from studying abroad and it's never turned out quite as good as my host mom's. One time I translated a recipe from a Japanese cookbook and that went OK but not great. I tried Amy Kaneko's recipe from her book Let's Cook Japanese Food! and that had good results if I remember right (it's her Japanese father-in-law's recipe!) but I thought I'd give Just One Cookbook's recipe a try as well since I've had good luck with her recipes.

Notes:
  • I think leaving the skin on is the way to go. The squash gets quite soft during the cooking process and the skin helps hold it together and prevent it from completely disintegrating. I've peeled the squash completely before and the pieces stayed much more intact.
  • I do not have a proper otoshibuta (drop lid) and my foil ones in the past haven't turned out quite right. I used a clean regular pot lid that fit just inside the cooking pan and rested it on the surface of the food as it cooked. This didn't work well and I don't recommend it (see below).

Verdict: It was kind of bland but I think that's because I didn't cook it right. Overall I'm not sure I did the drop-lid thing right and less liquid evaporated during cooking than was supposed to, and that's why it turned out kind of bland. After it was done cooking and I realized it was too watery, I removed the squash from the pan and reduced the cooking liquid, and once cooled poured it over the squash and let it sit overnight in the fridge. It was not quite as good as if I had cooked it correctly, but it was much more enjoyable to eat than right after it was cooked.

RECIPE: Simmered Kabocha Squash

February 26, 2019

Winter Squash Galette with Caramelized Onions and Feta


This recipe, like a number of the ones on this site and in my regular rotation, comes from Smitten Kitchen (Butternut Squash and Caramelized Onion Galette) and to me via my friend Sarah. This is another thing that often pops up in tae kwon do dinners because it is vegetarian and it's easy to scale up to feed a crowd.

Though it is a bit time consuming and labor intensive, the result is well worth the effort. Any recipe that gets my husband to help me eat a winter squash is double good because they're pretty big for just one person. :)


Substitutions/variations
I have made it on my own maybe 3 or 4 times now.
  • The recipe originally calls for butternut squash. I vastly prefer kabocha squash (also known as buttercup squash) so I use that instead. It is less stringy and has less of that weird cloying squashy flavor and a little more sweetness. I think I used red kuri squash once and that was also tasty.
  • While a nice melty cheese in the filling is good, I think I like the saltiness of feta. A good mozzarella cheese would probably give the best of both worlds. I used hunks of goat cheese once, which was also good.
  • I add some shredded Parmesan to keep some of the "stinky cheese" vibe Deb wanted to imbue.
  • Plain Greek yogurt works really well in the crust.
  • I don't chill the bowls for the crust for an hour. Just make sure your butter is really cold and you're fine. Pretty sure this was written before she had children when she had 3 hours to make pie dough.
  • I also put the dough in the freezer to chill it faster if I'm in a hurry. Just don't leave it in there for too long or it will get too hard. I happen to have the world's largest home microwave and it has a gentle "soften" setting to defrost this dough without wrecking it, but if your microwave is more ham-handed with defrosting foods, you may just need to wait it out at room temperature if it gets too cold.

February 23, 2019

Lavender Shortbread Sandwich Cookies

 
I wasn't much for floral flavors up until a few years ago because they reminded me of soap. My first real try was in 2015 after I made a friend who absolutely loves the flavor of lavender, and because of her I came to think there was some merit to eating things that taste like flowers, especially if the flavor is combined with something else familiar.

However, what really cemented it for me was a cookie. A few years ago during the early summer, a different friend was visiting me from Chicago and we went to a milkshake shop. They had a lavender-lemon sandwich cookie, which she promptly bought because she also loves floral flavors, and shared some with me because it was huge -- two 4 inch diameter lavender sugar cookies with lemon buttercream frosting in between. The perfect flavor of sugar coma for a warm, sunny summer day.


The milkshake shop folded later that year but the memory of that cookie stuck with me. I ended up wanting to recreate it a couple of months later. I blended two recipes, one from Imagine Childhood and the other from From Calculus to Cupcakes. I was very happy with the result and shared them with my sister Kelly because she loves good food too. She apparently gave one of the cookies to her roommate Kayla, who went absolutely wild for it. Kelly told me that ever since then, whenever she comes back from seeing me and Kayla hears we were making food, she asks (only half jokingly I'm sure) if we made these.


I love this story and think it's adorable. I found out a couple of weeks ago that Kayla's birthday is in late February, and decided to surprise her by sending Kelly home from our latest hangout session with a bunch of these cookies so that this time, the answer to "did you make lavender lemon cookies?" was "yes, and I brought you some!" :)

Someday I'm going to make these heart shaped and serve them at a tea party.

-----------------

RECIPE: 

Lavender Shortbread Sandwich Cookies
Adapted from Imagine Childhood (cookie) and From Calculus to Cupcakes (filling)
Makes about 50 sandwich cookies

Cookies

1 cup granulated sugar
3 tbsp dried culinary lavender (if it's particularly fragrant you might use less)
1 1/3 cups (about 22 tbsp) salted butter
1 tsp pure vanilla extract
3 cups all-purpose flour
2 1/2 tsp baking powder
1 tsp baking soda

Filling

2 tbsp (1/4 stick) salted butter, at room temperature
2 oz (1/4 of an 8 oz brick) cream cheese, at room temperature
2 cups confectioners’ sugar
Juice and zest of half a large lemon

Cookies: Grind the lavender and half the sugar together with a mortar and pestle, then transfer it to a mixing bowl along with the other half of the sugar. (If you don’t have a mortar and pestle, place sugar in the stand mixer bowl and add the lavender slowly, rubbing it between your fingers to break it down a little bit.) Add the butter and cream until light and fluffy, then stir in the vanilla. Add the flour, baking powder, and baking soda on top of the butter mixture, stirring slowly until well incorporated.

Shape the dough into 3 logs about 1 1/4 inches in diameter each. Wrap each log in parchment paper, and place in the freezer until it becomes hard enough to slice (20-30 min). If you're going to chill it for longer, put it in the refrigerator until ready to use.

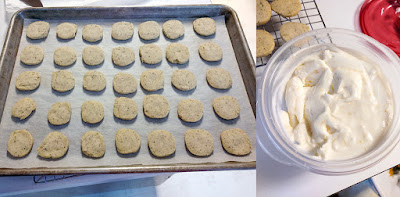
Preheat the oven to 350°F. Unwrap the dough and slice into rounds about 1/4 inch thick. Place on a parchment lined baking sheet. A standard half sheet pan will fit about 35 cookies. Bake until the bottom edges just begin to brown (8-10 minutes). After taking them out of the oven, let them stand 1-2 minutes on the pan, then transfer to a wire rack to finish cooling. While the cookies cool, prepare filling.

Filling: Beat butter and cream cheese on medium speed until well combined. Add the lemon juice and zest and mix on low speed until incorporated. Add the powdered sugar in 2-3 additions, mixing slowly, until incorporated. Once incorporated, beat the filling until well mixed, about 1-2 minutes.

Assembly: Using a knife, spread about 2 tsp of the filling on the bottom of a cookie. Top it with another cookie of similar shape/size bottom side down (so both cookies have top sides out) and compress gently with your fingers to stick everything together.

Store in an airtight container in a single layer in the refrigerator. Keeping them cold will help the filling stay in the cookie.

February 21, 2019

Baked Spanish Tortilla

Today's adventure in cooking is brought to you by A Clean Bake and leftover roasted thyme and onion potatoes.

Spanish tortilla (tortilla española, a potato and onion omelet) is something I grew into liking. My first experience with it was parties in my high school Spanish classes. It was not made in a particularly traditional way (the onions were barely cooked and they used frozen hash brown potatoes) and maybe that's why I wasn't into it. To be fair, it would have been difficult to cook it properly in a classroom, and I think it can be difficult even with the proper equipment.

I think I finally started making it for myself when I made a vegetarian friend and wanted to cook things for her, and decided to try this out because I had all the ingredients on hand. Sometimes I doubt that it will taste good, and every time it manages to prove me wrong. Spanish tortilla may be simple, but it is most definitely good.

Notes/changes:

  • Grease the baking dish well. I had trouble removing it and washing the dish afterward.
  • It might sound like a lot of olive oil to you but do not be afraid. It gives a rich, satisfying flavor to the entire dish.
  • I like to cook the onions until they're pretty soft rather than just translucent, because I like how sweet they get.
  • I started with cooked potatoes so I didn't cook those on the stove before putting them into the oven.
  • I like to sprinkle some smoked paprika on the top of the finished dish just before serving. Probably not traditional, but it's pretty and tasty.
  • This goes really well with green salad for a meal.

Verdict: Baking it was a nice change, even if I had trouble getting it out of the pan. If I'm making a small serving of it I'll probably continue to cook it on the stove but this is a good way to cook a lot of it.

RECIPE: Baked Spanish Tortilla

February 15, 2019

Chicken Grape Salad

This is one of my mom's recipes. When she and my dad were married but before they had children and were living in Colorado, a woman she worked with taught her how to make this salad. I didn't like mayonnaise or creamy dressings when I was a kid but I finally tried this salad when I was in high school, and I've been in love ever since. She told me that you can sprinkle toasted sliced almonds on top, but she generally didn't when she served it at home. It's especially nice in the summer a little cold from the fridge, but it's good any time really.

My local grocery store makes this salad, and while I don't like that it's overdressed and they keep the grapes whole, I do love that they put cashew pieces in it. So now I put cashews in it too. ;) Still not sure whether I prefer the chicken cubed or shredded. I think shredded chicken helps the dressing stick a little better but I very slightly prefer the texture of cubed. Try both and decide for yourself.

Notes:
2/15/19: Admittedly I think the recipe amounts could use some adjustment. As written, it makes kind of a lot of dressing for the amount of salad ingredients. I find that if you put in too much celery it's hard to taste the sweet flavors. Try not to make the dressing too thin or it will sit at the bottom of the container instead of sticking to the ingredients. I have been working on alternatives to Miracle Whip. For this latest batch I used a mix of plain Greek yogurt and Kewpie mayonnaise, because it's what I had and I thought straight regular mayonnaise might be too heavy. It worked all right but I think I needed to add a little more sugar and lemon because it was lacking the tang that Miracle Whip adds. I was using a particularly crappy brand of bottled lemon juice which didn't help.

----------------------------------------

RECIPE:

Chicken Grape Salad

Salad:
1 lb boneless skinless chicken breast
1 tsp olive or canola oil
1/8 tsp garlic powder
Salt and pepper to taste
¾ lb red grapes, washed
2 stalks celery

Dressing:
¾ cup Miracle Whip
1 tbsp lemon juice (fresh is best but bottled will do)
1 tbsp sugar, or to taste
¼ to 1/3 cup milk

Garnish (optional):
Sliced almonds or cashew pieces, toasted

Preheat oven to 375°F. Rub oil on chicken pieces and sprinkle with salt, pepper, and garlic powder. Bake until interior is no longer pink, about 20-25 minutes. Allow to cool enough to handle. While the chicken cools, chop celery into small pieces and cut each grape in half. Place celery and grapes in a large bowl. You can also prepare the dressing if you need more time for the chicken to cool.

For dressing: place Miracle Whip, lemon juice, and sugar in small bowl and mix with wire whisk until just combined. Add milk a little at a time until desired consistency. Set aside until ready to use.

When chicken is cooled, cut into bite size pieces or shred with a fork, and add to the bowl with the celery and grapes. Pour dressing over the salad ingredients and mix gently to coat. This tastes best when refrigerated for several hours before eating. Sprinkle with slivered almonds, if desired. Sprinkle toasted almond slices or cashew pieces immediately before serving, if desired.

February 2, 2019

Sunken Sour Cherry Cake


Our friends invited us to dinner at their house tonight, and asked us to bring dessert because they get really excited about what I make (always a great feeling). The weather was not that great, so I set to work finding a recipe I could make with what I already had, with the added challenge to make it nut free because one of their children is very allergic to peanuts. I started looking through my backlog of recipes to try, and found Not Quite Nigella's Sunken Sour Cherry Cake. I remembered I had a container of frozen sour cherries, and once I verified that I had enough to make the cake I got to work. I made it nearly exactly as written. I used a pound of frozen cherries in juice (hooray for sour cherries being a local crop for me!). The only thing I did differently was add both vanilla and rum.

I realize this is a German/European recipe where cakes tend to be less sweet and perhaps more dry than Americans might be used to. The cake was a good amount of sweet for me, but seemed a bit dry and didn't taste enough like cherries for my liking. Eating it with whipped cream was nice, but my favorite idea was reducing the sweetened juice the cherries were packed in, poking holes in the top of the cake, and spooning it over the cake just before eating it. A combination of whipped cream and this syrup would be especially tasty I think. I also think it goes incredibly well eaten alongside a cup of coffee or tea. The texture reminded me of an American coffee cake.

If I make this again, I would use fresh cherries and put more cherries in (frozen cherries likely had less moisture since I had to drain them) and maybe mix the cinnamon sugar into the cake batter.

RECIPE: Sunken Sour Cherry Cake