Showing posts with label meat. Show all posts

February 9, 2025

No-Bean Beef Chili

Another try borne from a desire to eat foods I loved before keto.

Notes:

  • The second time I made this I used canned tomatoes and it tasted fine, though I will admit I liked the taste of the fresh (frozen) tomatoes better.

Verdict: I loved it! I wasn't sure I would like chili without beans but apparently that is how traditional Texas style chili is made. My partner who is anti-bean loved it. I brought it to a party with non keto friends and they loved it too. Definitely keeping this one for future use.

--------------------

RECIPE: Keto Chili (Arman Liew, The Big Man's World)

October 17, 2024

Korean Style Ground Beef Stir Fry

I wanted to have more Asian style meals that I could eat with my current dietary restrictions and I had all the ingredients so I gave it a try.

Notes:

  • If you're not following a ketogenic diet you can use regular brown sugar and serve it with regular rice of your choice.
  • I love serving this with some kimchi on top, and if I'm feeling especially hungry and fancy, a (crispy) fried egg.
  • I have also made this with ground pork and it was good, but I think I prefer the beef version.

Verdict: I love this and have made it several times since the initial try. Great mix of sweet, salty umami. A go-to meal if I have ground beef.

-------------------

RECIPE:

Korean Beef
from Ioana Borcea (Low Carb Spark)
serves 3-4

1 pound lean ground beef
1/4 cup brown sugar replacement
3 cloves garlic minced
1/4 cup soy sauce
1 tbsp sesame oil
1/2 tsp red pepper flakes or more to taste
1/4 tsp ground ginger
To garnish: sliced green onions and sesame seeds

Place a large skillet over medium heat and cook the ground beef until no longer pink. Add minced garlic and continue cooking for one more minute. Combine brown sugar substitute, soy sauce, sesame oil, ginger, red pepper flakes in a small bowl. Pour the soy sauce mixture over the ground beef and cook until browned for about 5 minutes. Stir constantly. Serve over cauliflower rice, top with green onions and sesame seeds.

February 16, 2024

Korean Beef Bowl

Looking for a new dinner idea and had ground beef and a container of kimchi on hand, so I decided to make this.

Notes:

  • I served it with kimchi on the side.

Verdict: It was quick and tasty! Partner loved it too. I would definitely have it again.

----------------------

RECIPE: Korean Beef Bowl (Chungah Rhee, Damn Delicious)

July 4, 2023

Steak Garlic Rice


Verdict: Absolutely wonderful, even without the liquid smoke. This is definitely more of a special occasion, once-in-a-while-as-a-treat dish but it was SO good. I am not making the garlic chips from scratch again if I can help it because those were very fussy.

-------------------

RECIPE: Steak Garlic Rice (Just One Cookbook)

December 17, 2022

Skyline Chili (Cincinnati Style)

While having lunch with some friends from Cincinnati who were passing through recently, the topic of Skyline Chili came up and I was the only person at the table that hadn't tried it. I have only heard many good things about it from these and other friends, and my partner's band has stopped for it multiple times on tours (the drummer is obsessed with it). So I decided to make my own.

Notes:

  • The chili is meant to be served over spaghetti and topped with an absolute MOUNTAIN of finely shredded cheddar cheese. I skipped the chopped onions on top because I'm not a big fan of raw onion.

Verdict: I liked it a lot more than I thought I would, and I'd have it again.

--------------------

RECIPE: Skyline Cincinnati Chili (Insanely Good Recipes)

March 29, 2022

Chicken Andouille Sausage and Rice Skillet

I bought andouille chicken sausage and then remembered I didn't actually know what it tastes like, so I went looking for a recipe that sounded good and landed on this.

Notes/changes:

  • Used fresh chopped tomato instead of bell peppers and basmati rice instead of regular long grain white rice.
  • I didn't have tomato paste so I used tomato salsa (weird I know, but it was the closest thing I had with similar flavors to the final thing)
  • Added 1 tsp more cajun seasoning (Penzeys makes a nice blend), and 1 extra cup of broth because it did not seem like enough liquid to cook the rice. (The ratio was 1 rice:1 liquid in this recipe and the overwhelming majority of rice recipes use 1:1.5 or 1:2).
  • The rice was not cooked after 4-5 minutes (more cooked than I expected it to be, but definitely not done). I ended up cooking it for a total of 13-15 minutes.

Verdict: It was decent (I really liked the flavors) but I kind of want to try it again with tomato paste to see if that intensifies the flavor a little bit.

---------------------

RECIPE: One Pot Andouille Sausage & Rice Skillet (Gilbert's Craft Sausages)

October 7, 2021

Emeril's Braised Chicken Thighs

I had chicken thighs in the fridge and needed to cook them, and decided to try this.

Notes:

  • Used Penzey's Cajun seasoning instead of the Essence/Essence Creole seasoning because I had it already, it seemed similar, and was less work than mixing my own.
  • Didn't use the third tablespoon of butter and I didn't miss it.
  • Served with basmati rice.

Verdict: It's pretty good (smells AMAZING after the chicken first browns) but I think I'd change a few things next time. Maybe less liquid (2 cups instead of 3) because it seemed like a lot and didn't taste like much. Especially when you brown the chicken right at the beginning and immediately dilute all that beautiful browning and sog up the whole thing with tons of liquid. I realize the browning is probably more for flavor than crisping, but I think soggy chicken skin just doesn't appeal to me. Maybe if I roasted the chicken afterward instead of braising it, or removed the skin before serving.

-----------------

RECIPE: Braised Chicken Thighs (Emeril Lagasse)

October 1, 2020

Japanese Beef Curry

I am perfectly happy with the boxed version of Japanese curry but because we're trying to limit trips to the store lately, I decided to try making the roux from scratch! Because of this, I also just made do with a bunch of things I already had than going out to buy everything the recipe asked for.

Notes:

  • I made the roux from the Just One Cookbook recipe.
  • I sliced my beef really thin and added it right at the end rather than browning it at the beginning. 
  • I used 1/4 tsp powdered ginger instead of fresh.
  • I omitted the mushrooms because I didn't have any and don't like them in this style of curry.
  • I didn't have tomato paste and don't like using ketchup in cooking, so I chopped a fresh tomato and cooked it down in the pot instead.
  • Instead of beef broth, I used vegetable stock and water, and added a beef bouillon cube (again, because this is what I had in my house at the time).

Verdict: I wish it were a little bit thicker, but I really enjoyed that the spices were more flavorful in this version and feel good that there's no palm oil in my homemade version. I would definitely consider making it again.

-----------------

RECIPE: Japanese Beef Curry (Just One Cookbook)

June 4, 2020

Chinese Style Fried Chicken

finished fried chicken dish

This recipe scrolled by on one of my social media feeds a few years ago, and it caught my eye because it sounded really similar to a dish I like to get at one of my favorite local Asian fusion restaurants: crispy grilled chicken with ginger-scallion chutney. I was putting away chicken thighs this morning and remembered that I had this recipe, and realized I had everything I needed to try it out.

marinated chicken, finished sauce, and chopped tomatoes

chicken cooking in pan on the stove

Notes:
  • I served this with jasmine rice.
  • I marinated the chicken for longer than directed, about 3 hours.
  • I did not have a fresh chili pepper on hand so I used red pepper flakes to taste. If you don't want or can't have it spicy you can leave this out.
  • I used fresh baby spinach instead of mizuna because it was what I had on hand, but any salad green would taste good here, especially a slightly peppery one like arugula.
Verdict: It's not exactly the same as the restaurant dish but it is close, and quite delicious! It was relatively easy to make and I was pleasantly surprised that the skin actually got crispy. I would definitely make this again.

--------------

RECIPE:

Chinese Style Fried Chicken
adapted from Tasty Japan
Serves 2

2 chicken thighs, skin on

Marinade
1 tsp grated fresh ginger
1 tsp minced garlic
1 tsp salt
2 tsp sake

Sauce
2 tbsp soy sauce
2 tbsp rice vinegar
1 tbsp sesame oil
1 tbsp granulated sugar
1 tsp grated fresh ginger
1 tsp minced garlic
1 small scallion, minced
1 birdseye or Thai chili pepper, thinly sliced

4 tbsp canola oil
3 tbsp corn starch or potato starch
4 oz (1/4 lb) mizuna or arugula, or salad greens
12 cherry tomatoes, halved

On a cutting board, de-bone the chicken thighs if they have bones, then either score the skin with a knife or prick the skin all over with a fork. Place marinade ingredients in a quart sized plastic bag, then add chicken. Close the bag and move the chicken around inside it until marinade ingredients are mixed and chicken is fully coated in the marinade. Place in the refrigerator and let marinate for at least 30 minutes, and up to 4 hours.

Meanwhile, prepare sauce. Place all ingredients in a small bowl and stir until sugar has dissolved. Set aside.

When you're ready to cook the chicken, heat the canola oil on medium-high heat in a shallow frying pan on the stove. Spread cornstarch on a shallow plate. Remove chicken thighs from bag and discard marinade. Gently press each side of the chicken into the cornstarch to coat the entire surface, and shake off any excess. When oil is shimmering, place chicken in the pan skin side down and cook until the skin is golden brown and crisp, about 5-6 minutes. Flip each chicken thigh and cook for 2-3 more minutes or until chicken is cooked through.

To serve, let chicken rest for a few minutes, then slice. Place greens on a plate and place sliced chicken on top. Arrange cherry tomatoes around the chicken, then pour sauce over the top.

October 26, 2019

Biscuits and Sausage Gravy

This recipe is a common Southern breakfast dish and comes to me through my sister's boyfriend, Sam, who is not Southern but genuinely likes cooking. He cooks things on his own from scratch, not just when she invites him to cook together! Yay.
My mom came to visit this weekend and stay overnight at my house. We normally cook breakfast together when we see each other, so we all convened in my kitchen to cook breakfast in the morning. My sister and Sam brought ingredients for biscuits and gravy, and I was excited when I heard Sam had made this recipe before. I tried biscuits and gravy one time and thought it was fine, but it is not something I grew up eating, and I was unmotivated to make it for myself because I didn't like it enough to go through the process of trying recipes until I found one I liked, and it seems like biscuits and gravy is something for which there would be a lot of dubious recipes.

I love biscuits as a food and have tried to make them from scratch at least 3 or 4 times, but I was never satisfied with the end result. Each time I was disappointed they didn't taste like the canned ones. They were all bitter and metallic tasting so I didn't try for a long time. Today was different. He handed me the recipe for the biscuits, and my sister and I worked on them while he made the gravy. They were pretty easy to make since I was familiar with the process. I got them out of the oven and they actually. tasted. good. Not bitter at all. I can make biscuits I like now!

Notes:
  • The photos in this entry depict a doubled batch. We served it to 5 people and had a little less than half left over.
  • Use aluminum free baking powder! The biscuits are less likely to be bitter that way.
  • Sam sometimes makes these as drop biscuits, either as 8-10 small biscuits like the recipe calls for or 4 larger ones (you may need to bake them longer). I shaped the dough into a 3/4 inch thick rectangle and cut it into 12 pieces (for a single batch, cut into 6) with a chef's knife.
  • Sam liked the flaky and layered texture of my batch. I attribute this to not overhandling the dough and cutting in the shortening with a pastry blender rather than a fork -- this keeps the fat in larger chunks.
  • I lined the baking sheet with parchment paper instead of greasing it and it worked great.
  • I baked the 12 biscuits for 13 minutes and it was perfect -- they were golden brown on top while being fully cooked but not dry in the middle.
  • I'm considering making the biscuits with another fat sometime (butter in particular) and seeing how they go because I'm not a fan of shortening.
  • If you end up with extra biscuits, they taste great warm with butter and/or jam.
  • Sam usually uses Italian sausage for the gravy but I think breakfast sausage might also taste good.
  • The leftover gravy can be refrigerated and reheated. It thickens more as it cools, so you will likely need additional milk or water to thin it out.
--------------

RECIPE:

Biscuits and Sausage Gravy
from Baker's Corner Baking Powder (biscuits), Betty Crocker (gravy)
Serves 4, up to 6 with additional meal items

Biscuits
2 cups all purpose flour
2 1/2 tsp aluminum free baking powder
1/2 tsp salt
1/3 cup Crisco or other shortening
3/4 cup milk
1 tbsp butter, melted (for brushing)

Sausage gravy

1/2 lb pork sausage meat (breakfast sausage or mild Italian sausage)
1 tbsp butter or canola oil
2 tbsp all purpose flour
1 cup milk (we used 1%)
1/4 tsp salt
1/4 tsp freshly ground black pepper

Prepare biscuits: Preheat oven to 475°F. Stir together flour, baking powder, and salt in a medium mixing bowl. Cut in shortening with a pastry blender until the texture of coarse crumbs (around 1/8 inch / 3 mm pieces). Make a well in the center of the flour mixture and pour the milk into the well. Stir with a fork until milk is just incorporated and dough begins to pull away from the sides of the bowl. Turn out the dough onto a lightly floured cutting board or other flat work surface and knead for approximately 30 seconds, or until the dough just comes together, taking care not to overwork it. Pat into a rectangle about 7 inches long, 4 1/2 inches wide and 3/4 inch thick, then cut into 6 pieces (3x2). Transfer to a parchment lined baking sheet and brush the top of each piece with melted butter. Bake for 11-15 minutes or until golden brown. If there's any melted butter left over, brush the baked biscuits with it after removing them from the oven. Serve warm with gravy.

Prepare gravy: Heat a skillet or deep frying pan on the stove over medium-high heat. When the pan is hot, add sausage to the pan and fry until well browned. Remove browned meat from pan into a medium bowl, keeping the drippings in the pan, and set aside. Return pan to the heat and add butter or oil. When the butter is melted, sprinkle in the flour with a wooden spoon. Stir to combine, being sure to scrape the browned bits off the bottom of the pan. Cook for 2-3 minutes, until mixture bubbles and has turned light brown. Whisk or stir in milk a little at a time, making sure mixture is smooth. Continue to cook, stirring constantly, over medium-high heat until mixture boils and thickens slightly. If it gets too thick, stir in more milk, a little at a time, to thin it to the desired consistency. Stir in salt and pepper, then add cooked sausage back in, stirring gently to combine. Serve hot over biscuits.

July 30, 2019

Beef Marinade

My family has made this for holidays and special occasions for as long as I can remember. Filet mignon is not really something that needs this kind of preparation to taste good, but it definitely tastes good this way to me.

My dad told me about the reaction this got the first time my grandma made it. I'm not sure where my grandma got the recipe. It was for some sort of family party. He helped her prepare a large amount of venison (something like 10 pounds) and mix the marinade, and then ended up needing to go somewhere for a few hours. He came back to find that it was all gone. All of the meat had been cooked and eaten before my dad could have some. Maybe this is why he always makes so much of it, so that he and we will always have as much as we care to eat.

Part of me thinks he'd be upset with me for sharing it here because he's told me not to share it before (I don't know how serious he was) but honestly, what is the point of secret recipes? Who are we keeping it a secret from and why? I sort of get why they were a thing before the internet but not anymore. It's not like we run a restaurant where we stand to gain financially from a proprietary recipe, or have friends that only like us for our delicious food that would stop coming to see us if they could make it themselves. Personally, I love sharing good recipes because then more people can enjoy the delicious things we make.

Notes:
  • I realize some things could probably be executed better, but this is how you get it to taste like family nostalgia. If you like doing things a little differently, absolutely go ahead and improve upon it.
  • This would probably work well with other cuts of beef and other kinds of meat. My grandma first made this with venison.
  • Grilling is by far the best way to cook this. If you can't grill it, broil it.
-----------------

RECIPE:

Beef Marinade
from my grandma
Serves 4-6

1 lb beef tenderloin
1/4 cup brown sugar
1 tsp ground ginger
1 tsp dry mustard
1 tsp salt
2 tbsp molasses
1/4 cup soy sauce
1/4 cup vegetable oil
1/4 cup water
2 cloves garlic, chopped
1/2 large onion, chopped

Cut beef tenderloin into 1/4 to 1/2 inch slices. Stir remaining ingredients together in a large bowl until sugar is dissolved. Add beef and marinate for 6-18 hours. Grill over medium-high heat for about 1-2 minutes per side, or to desired doneness.

March 18, 2019

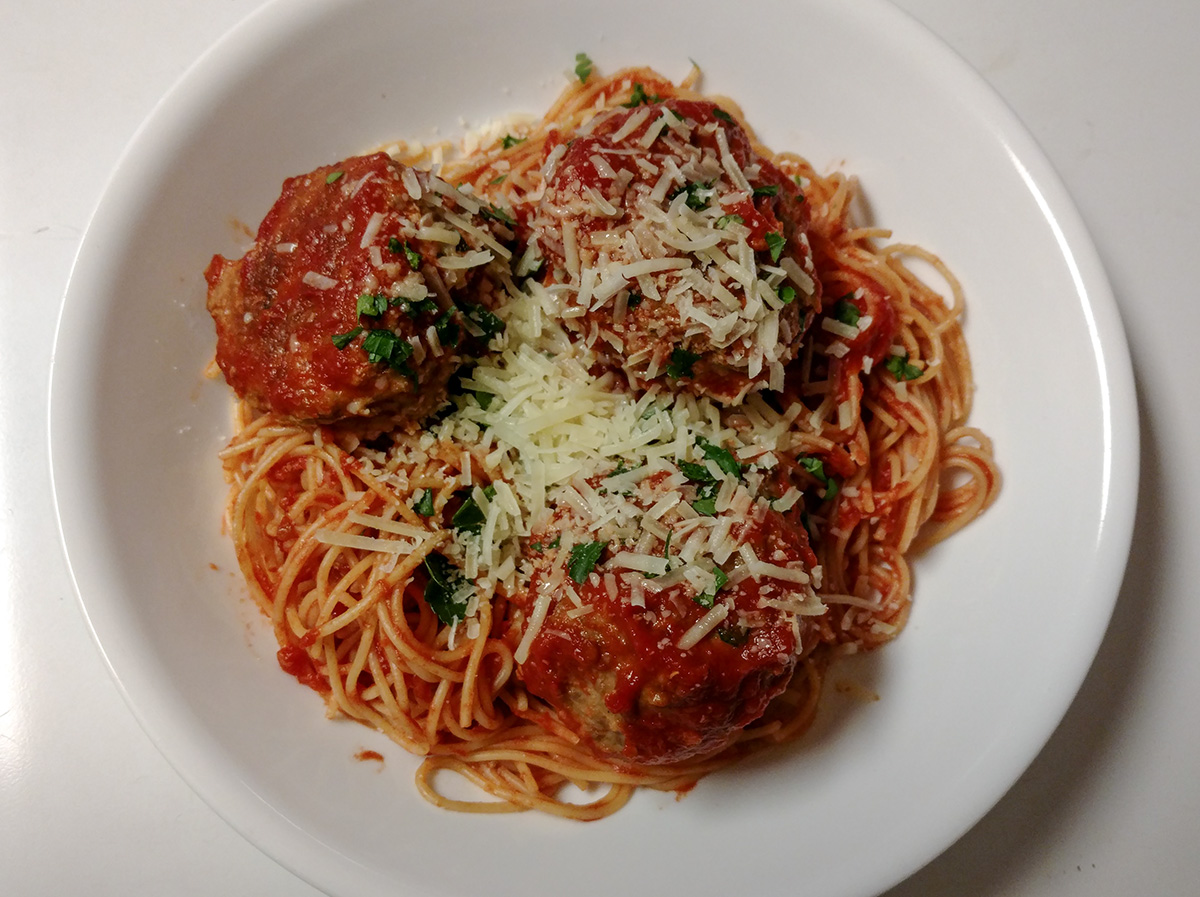
Smitten Kitchen's Perfect Meatballs and Spaghetti


I'm on a roll with the Smitten Kitchen recipes lately! I saw this on her Instagram recently and had to try it because it looks delicious, the meatballs are baked in the oven (the only way to do it as far as I'm concerned), and both my husband and I are big fans of spaghetti and meatballs.

Changes/deviations:
  • I used half ground chuck (beef) and half ground pork for the meat.
  • I doubled the meatballs because I wanted leftovers and there wasn't a good way to only buy 1/2 pound of each type of meat when I was buying it. I used 3 eggs (doubled would have been 4).
  • Used angel hair pasta instead of spaghetti because it's what I had
  • Cooked meatballs for ~15 minutes because they weren't done after 12 minutes, and I think it's because I made mine bigger than the recipe asked. Apparently my estimation of 2 inches is a lot bigger than 2 inches, haha. I ended up with 16 large meatballs (doubled recipe) while the recipe photos show 12 meatballs for a single batch. whep.
  • Accidentally doubled the garlic in the sauce even though I wasn't doubling the sauce. Sometimes too much garlic can ruin a dish but a couple extra cloves' worth was fine here.
Verdict: Definitely will make again. It's a little more fussy than what I'm used to (! lol because this is supposed to be easy, and it was) but well worth the effort. The meatball mixture felt kind of soft but they cooked really nicely and smelled wonderful. You can really smell the cheese in them. Since I was only making it for two people I might cut back on the pasta next time, though I also don't want to prepare pasta 2-3 times for this. I had never made pasta like this where you heat it again with some of the sauce and reserved pasta water and it was great! This would be a really good, easy thing to make for a dinner party.

March 3, 2019

Teriyaki Pork Rice Bowl


Today's adventure in cooking is once again brought to you by Just One Cookbook! I turn to Nami's blog for many a Japanese food recipe because it covers a lot of good home cooking recipes that I miss from my host family, and new home cooking recipes to try. Donburi (rice bowls) remains one of my favorite genres of Japanese food, so I was excited to try this when I saw it.


Pork chops are something that can be hard to make interesting. When I was a kid my mom would bread them with crushed crackers and pan fry them, and I liked them even if they could be kind of dry. My husband had only ever had them coated in Shake-n-Bake and it was a frequent meal at his house. He didn't like it all that much to begin with and quickly got sick of it, so for the longest time he was convinced he hated pork chops. He was really suspicious the first time I said I was making pork chops, but once I assured him there would be no Shake-n-Bake anywhere near it he agreed to try it. I am slowly trying to make his knee jerk reaction to the words "pork chops" go away, and so far he's liked all the ways I've prepared them. Just don't call them pork chops when you tell him what it is and it's fine. ;) We've half jokingly taken to calling them "pork steaks" instead, haha.

This, however, was the first way I've had pork chops that I thought was exceptional.


I tripled the recipe since I had a family size package of pork chops, and it seemed like it would make good leftovers. I made very minor substitutions: bottled minced ginger and garlic instead of fresh because it's what I had, and baby spring mix instead of iceberg lettuce. I made sure the garlic was drained really well since it was going to be cooked in oil. I also cooked the sauce down slightly after removing the pork chops from the pan to make it a little thicker. I tasted the sauce all by itself after reserving it from cooking and it seemed like it was missing something, but on top of the finished dish, it's perfect! Resist the urge to add anything to it. I feel like the amount of cornstarch listed is very generous and you could easily do with less; I used maybe 3/4 of that amount.


Verdict: For how easy this is to make, it was REALLY good. My husband also really liked it. I will definitely be making this again!

RECIPE: Teriyaki Pork Donburi

February 15, 2019

Chicken Grape Salad

This is one of my mom's recipes. When she and my dad were married but before they had children and were living in Colorado, a woman she worked with taught her how to make this salad. I didn't like mayonnaise or creamy dressings when I was a kid but I finally tried this salad when I was in high school, and I've been in love ever since. She told me that you can sprinkle toasted sliced almonds on top, but she generally didn't when she served it at home. It's especially nice in the summer a little cold from the fridge, but it's good any time really.

My local grocery store makes this salad, and while I don't like that it's overdressed and they keep the grapes whole, I do love that they put cashew pieces in it. So now I put cashews in it too. ;) Still not sure whether I prefer the chicken cubed or shredded. I think shredded chicken helps the dressing stick a little better but I very slightly prefer the texture of cubed. Try both and decide for yourself.

Notes:
2/15/19: Admittedly I think the recipe amounts could use some adjustment. As written, it makes kind of a lot of dressing for the amount of salad ingredients. I find that if you put in too much celery it's hard to taste the sweet flavors. Try not to make the dressing too thin or it will sit at the bottom of the container instead of sticking to the ingredients. I have been working on alternatives to Miracle Whip. For this latest batch I used a mix of plain Greek yogurt and Kewpie mayonnaise, because it's what I had and I thought straight regular mayonnaise might be too heavy. It worked all right but I think I needed to add a little more sugar and lemon because it was lacking the tang that Miracle Whip adds. I was using a particularly crappy brand of bottled lemon juice which didn't help.

----------------------------------------

RECIPE:

Chicken Grape Salad

Salad:
1 lb boneless skinless chicken breast
1 tsp olive or canola oil
1/8 tsp garlic powder
Salt and pepper to taste
¾ lb red grapes, washed
2 stalks celery

Dressing:
¾ cup Miracle Whip
1 tbsp lemon juice (fresh is best but bottled will do)
1 tbsp sugar, or to taste
¼ to 1/3 cup milk

Garnish (optional):
Sliced almonds or cashew pieces, toasted

Preheat oven to 375°F. Rub oil on chicken pieces and sprinkle with salt, pepper, and garlic powder. Bake until interior is no longer pink, about 20-25 minutes. Allow to cool enough to handle. While the chicken cools, chop celery into small pieces and cut each grape in half. Place celery and grapes in a large bowl. You can also prepare the dressing if you need more time for the chicken to cool.

For dressing: place Miracle Whip, lemon juice, and sugar in small bowl and mix with wire whisk until just combined. Add milk a little at a time until desired consistency. Set aside until ready to use.

When chicken is cooled, cut into bite size pieces or shred with a fork, and add to the bowl with the celery and grapes. Pour dressing over the salad ingredients and mix gently to coat. This tastes best when refrigerated for several hours before eating. Sprinkle with slivered almonds, if desired. Sprinkle toasted almond slices or cashew pieces immediately before serving, if desired.

January 30, 2019

Carnitas (Mexican Braised Pork)


Today's adventure in cooking is brought to you by The Homesick Texan!

My oldest brother introduced this recipe to me when he made it for one of our family gatherings at Christmas. I have made it a couple of times since then, both with my family and on my own. This latest iteration was made while hiding from the insane cold the polar vortex brought this winter. Sounded like the perfect thing to make when it's absolutely frigid outside.

I like to keep it very neutrally flavored so that I can use it for a variety of things. You can put it in any Mexican or Tex-Mex dish that calls for carnitas. You can put barbecue sauce on it and eat it in a sandwich. I've put it in ramen (though I'm not sure everyone would like that).

RECIPE: Carnitas, Houston Style

January 27, 2019

Roast Pork Loin with Balsamic, Dijon, and Thyme

Today's adventure in cooking is brought to you by Kitchen Confidante! I tried out this recipe because I had fresh thyme to use up, and wanted to make something a little special to welcome my husband home from a trip but also not have to go to the store because the weather was supposed to be awful.

I think the marinade was supposed to turn out a little thicker than mine did. I think it was because I used jarred minced garlic instead of fresh and perhaps a little too much oil or vinegar (I eyeballed things rather than measuring exactly). The only thing I did differently was not sear it before roasting it in the oven. I thought searing it after marinating was kind of an odd choice, technically speaking. Plus, the last time I tried to sear a marinated pork loin, the marinade on it burned and I had a hell of a time cleaning the pan. (It had a significant amount of sugar in it which probably didn't help, and this recipe seems to have less but the searing after marinating idea still seems strange to me.)

I served it with oven roasted potatoes (with thyme and onion) and steamed broccoli, and we cooked and reduced the marinade to serve as a sauce, which was pretty salty and garlicky.

Personal verdict: It was good but not exceptional -- I wouldn't go out of my way to make it again. Still searching for a go-to pork loin preparation. Pork tenderloins seem to be far too easy to eat too much of but I think it's because they're inherently appealing, like you could put just about anything on it and it would taste good. My favorite so far was a garlic parmesan pork tenderloin I had at a Brazilian rodizio grill. If I could find a good recipe for that...

RECIPE: Roast Pork Loin with Balsamic, Dijon, and Thyme

January 21, 2019

Chinese Five Spice Chicken

Sometimes you don't know how good you have it until things change. Our local grocery store has a pretty decent Chinese food hot bar, and one of my favorite things on it was Five Spice Chicken. It was not breaded and had a really tasty sweet-salty sauce with Chinese five spice (a savory warming blend of star anise, fennel, clove, cinnamon, and Sichuan peppercorns).

Then one day, it disappeared from the bar and we thought it was just temporary but after a month or so it was still not back. We finally asked why they don't have five spice chicken anymore, and they told us that the cooks that knew how to make it had stopped working at the store. Baffling that they don't have standard recipes since they often have the same things on the bar.

Chinese restaurants in my area don't seem to have it on the menu, so then I decided to see if I could figure out how to make it and came across Marc Matsumoto's recipe. The picture looked really close to what used to be served at the store, so I gave it a go. You marinate skin-on chicken thighs for about a day, then broil in the oven or grill.

Notes:
  • I used honey instead of maltose.
  • I marinated the chicken for 48 hours and it was quite flavorful.
  • It says you can boil the remaining marinade but I had almost none to speak of. If you want an appreciable amount of sauce for your chicken, consider making extra marinade.
  • I think this would taste even better grilled.
  • I served it with rice and steamed broccoli.

Verdict: It was a lot of work because I only have a small cooking rack and had to cook it in small batches. It was surprisingly close to the stuff at the grocery store! If it had more sauce it would have been perfect. I want to try this again but maybe double the marinade/sauce and see how things go. Rasa Malaysia also has a five spice chicken recipe I might try to compare.

------------------

RECIPE: Chinese Five Spice Chicken

January 7, 2019

Pork and Napa Cabbage Millefeuille Hot Pot


I tried Just One Cookbook's millefeuille nabe (hot pot) for dinner tonight. Nabe/hot pot dinners were some of my favorite winter meals at my Japanese host family's house and I miss them every winter. Single tabletop burners are common in Asian households but I do not have one, which makes it particularly hard to eat in the traditional style, where everyone sits around the table and cooks ingredients in the pot on this burner as they eat. I was particularly drawn to this recipe because you can cook all the hot pot ingredients at one time on the stove and then serve it.

Probably the hardest part was standing all the layers up into the pot. For reference, the pot I used was about 10" in diameter and I think it was the perfect size, possibly even a little small. I stuffed those enoki mushrooms in there because we desperately wanted to eat them, and not because there was extra room.

I was really happy with the result. We served it with ponzu and shichimi togarashi. It was light but filling, and warming (it was a cold night). I would absolutely make this again!

RECIPE: Millefeuille Nabe (Hot Pot)

December 25, 2018

Gyoza (Japanese Style Potstickers)


For those unfamiliar with pot stickers, they are a type of Asian pan-fried dumpling filled with ground meat (usually pork) and vegetables. I first tried them during my year studying abroad in Japan. My host mother would occasionally buy dinner at the department store on days she didn't have time to cook, and sometimes she would get these.

You can usually buy pot stickers frozen at Asian markets and they are tasty and reasonably healthy for a quick meal, but homemade ones taste significantly better and are absolutely worth making yourself if you're up to the task. Filling and shaping them is admittedly a lot of work, and if you can recruit people to help you, you should make a lot of them and freeze them for later.

I think my favorite part about these is the meaty flavor of the pork mixed with the salty, tangy dipping sauce.

Notes:
  • You will likely use a lot more than 1 teaspoon of filling in each one. I tend to fill them quite a bit more than that and I still end up with a few extra wrappers.
  • I have used square wrappers when I couldn't find round ones. Fold them diagonally to form a triangle when you close them.
  • I usually freeze them after assembling but before cooking. Freeze them on a pan for ~30 minutes before placing them in a freezer bag. If you throw them all in the bag at once and then freeze them, they will freeze into a giant ball and they are near impossible to cook properly from frozen that way. Yes, I have done this before and don't recommend it
  • I like to serve these with freshly cooked Japanese rice (white or brown) and a steamed or boiled green vegetable like pea pods, edamame, green beans, or broccoli.
----------------

RECIPE:

Gyoza (Japanese Style Potstickers)
very slightly adapted from the recipe in Let's Make Japanese Food! by Amy Kaneko
Makes about 48

Filling
1/2 lb napa cabbage or green cabbage, shredded and then finely chopped into lengths no longer than 1/2 inch and squeezed between paper towels to remove excess moisture
3/4 lb ground pork or chicken
2 green onions (white and green parts), minced
3 fresh (or dried and rehydrated) shiitake mushroom caps, minced finely
1/2 bunch fresh chives, minced (if you can't find these, use 2 more green onions)
1 tsp peeled and grated fresh ginger, or 1/4 tsp dried powdered ginger
1 tbsp minced garlic (about 3 large cloves)
1 tbsp sesame oil
1 tbsp sake (I recommend Gekkeikan or Ozeki)
1 tsp soy sauce

About 50 round gyoza or other Asian dumpling wrappers, each about 3 inches in diameter (the thinnest ones you can find)
2 tbsp canola or other neutral oil, for cooking each batch
2-4 tbsp water, for cooking each batch (depends on the size of your pan)

Dipping sauce (per person, adjust to taste)
1 tbsp soy sauce
1 tbsp Japanese rice vinegar (unseasoned)
A few drops sesame oil
A few drops chili oil or small amount of chili paste (optional, if you like your dipping sauce spicy)


Prepare the filling: Place the cabbage, ground meat, green onions, shiitakes, chives (if using), ginger, garlic, sesame oil, sake, and soy sauce in a large bowl. Mix together with your hands until just combined. Be careful not to overmix the filling.

Shape the gyoza: Fill a small dish with about 1/4 cup water and place it near you. Keep a clean, dry baking sheet lined with parchment paper nearby (this will hold the shaped dumplings). Remove the wrappers from their package and wrap the stack loosely in a clean, damp towel or paper towel so that they do not dry out while you work. Place a single wrapper in the palm of your hand. Spoon about 2-3 tbsp of the filling into the middle. Using your other hand, dip your fingertip into the dish of water, then gently wet half of the edge of the wrapper with this finger. Fold the wrapper, matching the wet edge with the dry, closing the filling inside. Pinch the edges firmly to seal. Pleat the edge about 3-4 times, pinching the pleats closed to keep them in place. Place the dumpling on the baking sheet with the pleated edge pointed up. Repeat until you have used up either all the wrappers or all the filling (I usually end up with extra filling.

If you are planning to freeze any dumplings, do so at this point. Make sure none of them are touching each other. Place the pan in the freezer for approximately 30 minutes, then remove them from the pan and put them in a freezer bag for up to 6 months.

Cook the gyoza: Place a frying pan on the stove over high heat. Make sure you have a lid handy that is big enough to cover the whole pan. Add the canola oil to the pan after about 5 minutes. When the oil is hot enough (you can check by flicking a drop of water into the pan; if it immediately begins sizzling the oil is ready), place your desired number of gyoza in the pan in a single layer, making sure they can all sit flat on the bottom of the pan and the pleated edges are pointing up. When the bottoms have browned slightly (after about 3 minutes), add about 2-4 tbsp of water, enough to just cover the bottom of the pan. It should sizzle and generate a lot of steam. Cover the pan immediately with the lid to trap the steam inside. Reduce the heat slightly and cook covered for about 5 minutes. Remove the lid and cook for several more minutes. They are ready when the water has completely evaporated from the pan (it will sound different when the water is gone) and the dumplings are a deep golden brown on the bottom. Remove the pan from the heat.

If cooking the dumplings from frozen, you can cook them directly from the freezer. When at the steaming stage of cooking, let cook for a few minutes longer than you would if they were fresh.

Gently slide a spatula under the cooked dumplings to remove from the pan so as not to tear the wrappers. Place on a plate, flipping them so that the browned side faces up. If you're really skillful, they will come out all stuck together in one big piece with the crust intact! Serve with dipping sauce.

Make dipping sauce: Place all ingredients in a small dish and stir to combine.

December 12, 2018

Hunter's Pie with Brown Ale Gravy


A couple of friends recently gave us some ground venison that they hunted, and told us to make sure to cook it thoroughly. Normally with good meat I make simple burgers so as to let the meat's flavor shine but that was out of the question with wild game, especially deer. I got the idea to use it in shepherd's pie instead of lamb, and decided to call it hunter's pie instead. They call it cottage pie when you put beef in it, so why not change the name again for venison?

I very loosely based the filling on this shepherd's pie one by Sprig and Flours because I liked the idea of putting beer in it. I say loosely because as with much of my cooking, today I was cooking with the ingredients I already had rather than running to get the exact ones the recipe calls for. Different meat, slightly different vegetables, slightly different ratios of vegetables (I had lots of carrot), different beer (Newcastle brown ale instead of stout), no tomato paste, and I just winged the mashed potatoes.

This was my first taste of venison, and it was a bit different from what I expected! I was expecting it to be kind of like beef. It's more like ground pork in terms of color and flavor, but leaner. I'd use it again in something like this.

RECIPE: Shepherd's Pie with Brown Ale Gravy